We have used:
python version: python3
machine: linux
django version: django-2.x
Project Structure
Lets assume that you have a django project and the folder structure looks like this:
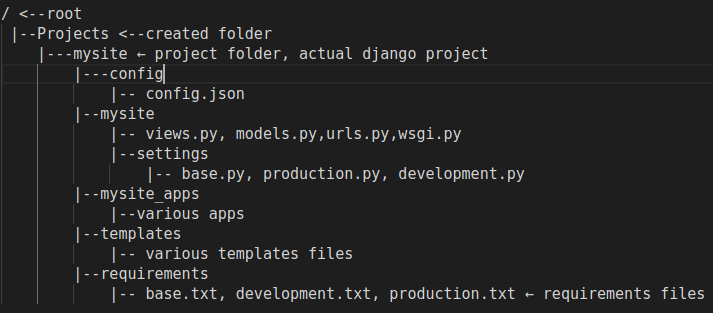
About structure
mysite/ is our django actual project
config/ folder has config.json file which contains all our configuration file.
mysite/settings/ folder contains main setting of our application.
Setting is seprated in base.py, development.py and production.py.
If we want to run in development mode we need to pass the settings file.
base.py is common settings file and development.py is for development mode.
For running app in development we do: python3 manage.py runserver –settings=mysite.settings.development.
Requiremnts/ folder has our requirement files
base.txt– all pacakges in our app
development.txt – packages only used in development(e.g django-debug-toolbar)
production.txt – package used in production environment but not in development.
mysite/ contains main djago apps.
mysite_apps/ contains all our apps(note this folder is a python package)
Requirements
nginx: Nginx is used as a server to serve static files in our project to the user. gunicorn: This is an used as an application server to serve our application. In development mode we can do python3 manage.py runserver and it will run the app. If we want to run the app using gunicorn we need to configure gunicorn in our application. We will see the configuration later. supervisor: This tool is used to run gunicorn. Setting supervisor will help our application to restart in case of any problem. Supervisor is configured to handle running of gunicorn.
What is the flow of application:
user request —> nginx server—> gunicorn(served by supervisor)—>our django app
Steps:
- Install requirements
- Setup virtualenvironment for our application
- Clone the project from github or other version control system
- Install requirements of our application(i.e. packages used by our app)
- Setting up postgres database
- Run migration and test application by running it
- Configure gunicorn
- Configure nginx
- Configure supervisord (or simply supervisor)
- Test everything is running fine
1. Install requirements:
Here we assume that we are using python3 for our application and we are deploying on linux machine. We need to install python3 using pip, virtualenv. Enough talk lets dive into it: Log into the vps machine using the credentials given by your vps provide. Once you are in we go through following steps: First lets update our machine and install python3 and virtualenv:
sudo apt-get update
sudo apt-get upgrade
sudo apt-get install python3-pip
sudo pip3 install virtualenv
2. Setup virtualenvironment for our application:
Lets create a virutal environment and start the virtualenv
virtualenv /Projects/venv
source /Projects/venv/bin/activate
3. Clone the project from github or other version control system
Now we clone our project from github:
git clone http://github.com/[path to your project]/mysite.git4. Install requirements of our application(i.e. packages used by our app)
Once the app is downloaded and virtualenv is running lets install the requirements. All our project dependent packages are in base.txt file and we use production.txt file to install from base.txt and also other packages from production.txt. We go to folder where manage.py is and run following command:
pip install -r requirements/production.txt5. Setting Up postgres database
- first go to postgres as:
sudo su - postgres- Then create database and user and set password in user:
postgres=# CREATE DATABASE db_name;
postgres=# CREATE USER db_user;
postgres=# ALTER USER db_user PASSWORD 'myPassword';- Grant permission:
postgres=# GRANT ALL PRIVILEGES ON DATABASE db_name TO db_user;- After granting permission log out from psql using ‘\q’ symbolizing quite. Then change the postgres user to root user as:
postgres@server:~$ su - root6. Run migration and test application by running it
cd mysite
./manage.py migrate --settings=mysite.settings.production
./manage.py runserver --settings=mysite.settings.production
After testing everything stop the server.
7. Configure gunicorn
Lets install gunicorn:
pip install gunicornAfter installing gunicorn lets run our application using gunicorn for testing
DJANGO_SETTINGS_MODULE=mysite.settings.prduction gunicorn mysite.wsgiNote: This is similar to saying ./manage.py runserver –settings=mysite.settings.production in development.
We can also pass workers to gunicorn using workers parameter as:
DJANGO_SETTINGS_MODULE=mysite.settings.prduction gunicorn --workers 3 mysite.wsgiOnce we verify everything is working fine we move on to configuring nginx.
8. Configure nginx
Lets install nginx:
sudo apt-get install nginxAfter installation lets configure nginx file in /etc/nginx/sites-available/ Lets create a file name mysite in /etc/nginx/sites-available/mysite and add following configuation:
server{
	listen 80;
	server_name ipaddress(e.g.x.x.x.x);

	location /static {
		alias /var/www/html/Projects_static_root;
		expires 30d;
	}

	location /media {
	alias /var/www/html/Projects_media_root;
	expires 30d;
	}

	location / {
		include proxy_params;
		proxy_pass http://127.0.0.1:8000;
	}

	}
Here in place ipaddress(e.g.x.x.x.x) use the ipaddress provided by your host provider.
Now, check if our configuration file was correctly written and start our nginx:
sudo nginx -t
sudo service nginx restart
9. Configure supervisord (or simply supervisor)
Installation:
sudo apt-get install supervisorNow, let’s create mysite.conf in /etc/supervisor/conf.d/ folder:
sudo vim /etc/supervisor/conf.d/mysite.confand configure our project:
[program:mysite]
command=/root/Projects/venv/bin/gunicorn --workers 3 --bind 127.0.0.1:8000 mysite.wsgi:application
environment=DJANGO_SETTINGS_MODULE=mysite.settings.production
directory=/root/Projects/mysite
autostart=true
autorestart=true
stderr_logfile=/var/log/mysite.err.log
stdout_logfile=/var/log/mysite.out.log
user=root
group=www-data
programs:mysite
Now lets start our app uing supervisor
service supervisor stop
service supervisor restart
Now our app should be running on the ipaddress configured by you check for further details.